A wireless mouse is a computer peripheral used to direct the on-screen pointer. Wireless mouse connects to devices through Bluetooth or Wi-Fi, unlike wired ones. Chromebooks, Google’s laptop OS, allow wireless mouses, easing navigation and interaction. A wireless mouse is a common add-on for Chromebook owners who want to quickly and precisely navigate their computers. This article will guide you through Chromebook wireless mouse setup.
A step-by-step tutorial for connecting a wireless mouse to a Chromebook is provided here:
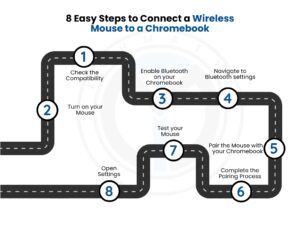
You should first see if your wireless mouse can be used with your Chromebook. While Chromebooks are generally compatible with a wireless mouse, a few models may only work with special drivers or software.
Please ensure the wireless mouse is Chrome OS-compatible before connecting it to your Chromebook. Although most wireless mouses should function, you should check the manufacturer’s website to be safe.
To proceed, activate your wireless mouse. Turn on the wireless mouse if it has a power switch. If there’s no on/off switch, insert batteries in. Check to see if the batteries for your wireless mouse are in place. A mouse’s power switch may be located on the mouse’s underside.
Flip the mouse over and turn the switch to the ON position. Once the mouse is attached to the USB receiver, it can be used immediately; another setting is unnecessary. Keep in mind that a “unifying receiver” is used by several wireless accessory makers. This single USB receiver can receive several wireless inputs from the same vendor. If your computer has a shortage of USB ports, this configuration is a suitable option.
Chromebooks need Bluetooth to use a wireless mouse. Click the settings symbol in the status area in the lower right corner to open the settings menu. Turn Bluetooth on by toggling the switch. A scanning status will appear when enabled as your Chromebook searches for nearby, active Bluetooth devices. You can choose your wireless mouse when it pairs and link to it.
You’ll notice the mouse pointer movement when you move your mouse once your Chromebook and Bluetooth wireless mouse have connected. Remember to turn your Bluetooth mouse on and off again if it doesn’t appear. You might also turn Bluetooth off and then back on in your Chromebook. After you pair your mouse with your Chromebook for the first time, the connection between the two devices will be established automatically.
From the settings menu’s left-hand menu, select “Bluetooth.”
Choose “Settings” and “Bluetooth” on the left. Test the Bluetooth toggle switch. Your Chromebook will now begin looking for Bluetooth devices that are accessible. Look for the “pairing” button or switch on your wireless mouse. Press and hold this button for a brief length of time when the LED light on the mouse starts to blink. The mouse is in pairing mode, as indicated by this.
After setting it in pairing mode, please wait for your Bluetooth mouse to appear on the device list. To connect your wireless mouse to your Chromebook, select it. Your Chromebook should now recognize your wireless mouse. To connect your wireless mouse to your Chromebook, click on its name.
You can finish the pairing process by following the on-screen prompts. To complete the process, you may need to enter a passcode or confirm a pairing code on your mouse.
After successfully connecting your wireless mouse to your Chromebook, you should test it to ensure it operates expectedly. Ensure the cursor moves correctly by moving your mouse around in different areas. Check the functionality of any additional buttons or features with your mouse by trying them out one at a time.
It is expected that you will be able to use your wireless mouse with your Chromebook once the pairing procedure is finished. Please verify that the mouse is working correctly by navigating the computer with it.
The Chromebook’s quick settings panel may be accessed by clicking the time in the lower right corner of the screen. You’ll see a gear icon there, which you may use to enter the settings menu.
If you are having difficulty connecting your wireless mouse, the following are some troubleshooting steps that may help you:
A Chromebook makes connecting a wireless mouse to the device incredibly easy and straightforward. Chromebooks are becoming more popular for personal and corporate use and they are lightweight, affordable, and user-friendly. You may take advantage of the freedom of utilizing a wireless mouse on your Chromebook by following just these few easy steps.
1. How do I get my Chromebook to recognize my wireless mouse?
To get your Chromebook to recognize your wireless mouse, turn on your mouse and make sure Bluetooth is enabled on your Chromebook. Go to Settings > Bluetooth, then select your mouse from the list of available devices and click Connect. If it’s a USB wireless mouse, plug the USB receiver into your Chromebook, and it should connect automatically.
2. How do I put a wireless mouse in pairing mode?
Most wireless mice enter pairing mode by holding down the Bluetooth or power button for a few seconds until a light starts flashing. This indicates the mouse is ready to pair. Check your mouse’s manual if the light doesn’t appear or if it uses a specific pairing button.
3. Can you use a USB mouse on a Chromebook?
Yes, you can use a USB mouse on a Chromebook. Just plug the USB receiver into one of your Chromebook’s USB ports. The mouse should start working instantly without installing any drivers.
4. Why won’t my Bluetooth connect on my Chromebook?
If your Bluetooth won’t connect on your Chromebook, try turning Bluetooth off and back on, and restart your device. Make sure your mouse or Bluetooth device is fully charged and in pairing mode. Also, remove old or unused Bluetooth devices that might interfere with the connection.
References: https://support.google.com/chromebook/answer/2587653?hl=en
https://www.lifewire.com/connect-wireless-mouse-to-chromebook-5093695
Discussion on Quora: https://www.quora.com/Where-is-the-power-button-on-a-mouse

IT Solutions and Managed Services Provider specializing in developing custom solutions.